Frank J. Chao
Technical Artist

About me
I am an innovative and serendipitous professional with 7+ years of uninterrupted experience in most of the work pipelines of videogame production and 3d real time graphics using Unreal Engine. Both one-man-band and committed team player, thrives in solving problems and taking ideas into real life solutions.
Portfolio Showcases

Tools and scripts

VFX

Shaders and materials

Lighting, Level art and design

Characters and Technical Animation
Professional Projects

Lysward
Lysward is a single-player survival adventure set in a vast and unforgiving desert in the fantastical world of Umbra. Explore, craft, team up with your companion, and leverage the Amri magic to endure the heat.

Exoborne
Open-world, tactical extraction shooter set in a world torn apart by extreme forces of nature. Customize powerful exo-rigs to gain strategic advantage in ever-changing weather conditions. Face hostile factions, enemy players, and Mother Nature herself in intense high-stakes sessions.

Above Land
AAA MMOARPG (Massively Multiplayer Online Adventure Role Play Game) set in a magical world above the clouds, humans and mythological creatures attempt to find a way to co-exist. A place where technology and fantasy blend together, new world meets the old and epic adventures await around every corner.

FusyFox
FusyFox is a fast-paced multiplayer third-person arena shooter that allows players to play and participate in tournaments. It combines Free-to-play and blockchain-based Play-to-earn models.

Goldfever
Gold Fever is a challenging, free-to-play, blockchain-based, survival PVP MMO. Its map is covered by dense and dangerous rainforests, tall mountains and, rivers filled with gold. Players can craft tools for survival and combat, forage for plants and herbs, and compete with other players.

A-VOID
A-VOID is a free-to-play mobile puzzle game for android devices. Akira must save her home planet from being devoured by its sun turned into a monstrous red supergiant star. To save her kin she must pass the trials of the guardians and gather enough core-cubes to gain control of the temple of the ancestors.
// Tools and scripts

Distance Field Pseudo Volume Texture Baker
Unreal widget blueprint/python utility tool for baking the distance field gradient of any mesh into a sliced pseudo volume texture to be used in raymarched shaders.

Geometry Script / C++ based Waterfall tool
C++ tool using Geometry Scripting for automating the generation of rivers, rapids and waterfalls that adapt to the scene.
SECTION UNDER CONSTRUCTION

Vector field baker
Blueprint / Python Editor utility tool for baking scene information into vector field assets that can be used in particle systems.
SECTION UNDER CONSTRUCTION
// VFX

Ravens Swarm
Cheap smart interactable GPU Particles System that simulate a swarm of agressive ravens. Done in Unreal Niagara using HLSL shader code modules to drive the behavior.

Stylized Monsters Attack Particles
Stylized particle effects for low poly enemy monsters in a friend's project.
SECTION UNDER CONSTRUCTION
// Shaders and Materials

CRT shader for emulators
This a simple postprocess shader that simulates CRT TV like effects to be applied mainly in the Nintendo GameCube / Wii emulator Dolphin.

Pseudo-Volume Texture Raymarched Shader
Raymarched shaders that uses sliced Pseudo-Volume Texture sampling to generate different volumetric effects.

Heavy Rain Post-Process
Complex Unreal Post-Process Material set to quickly and cheaply add adjustable heavy pouring rain to any scene.
SECTION UNDER CONSTRUCTION

Impact frame post-process
Unreal Post-Process Material to create a high contrast anime-like impact frame effect and its use in gameplay prototype.
SECTION UNDER CONSTRUCTION
//Lighting, Level art and Design

Unlit Level Art in A-VOID
Fully unlit level art work in the Unreal Engine powered game A-VOID for mobile Android and Vulkan devices. Prebaked lighting and other shader tricks were used to achieve a stylized but detailed and high contrast detailed art style.

Fractal cave level
Unreal Engine fantasy scene almost completely made out of 3D fractal mesh models generated with the software Mandelbulber 2 and using in-engine procedural tools for its placement.
SECTION UNDER CONSTRUCTION
//Characters and Technical Animation

Low Poly Stylized Zombies
A set of cartoonish zombies and skelletons I modelled in blender for a Jam game with some good friends.

Stylized Monsters Animations
Rigging and stylized animations in low poly enemy monsters in a friend's project.
SECTION UNDER CONSTRUCTION

Centipede Procedural Control Rig Animation
Control Rig / Animation Blueprint procedural animation of centipede AI enemy creatures made for the Above Land Project
SECTION UNDER CONSTRUCTION
// Tools and Scripts / DF Pseudo Volume Texture Baker
Interface and how it works
This tool is an Unreal editor utility widget that uses blueprint visual scripting and python for baking the distance field gradient of any mesh and to encode it into a sliced pseudo-volume texture that can be used in raymarched shaders. A pseudo-volume texture is just an atlas texture that store the volumetric slices in a grid fashion.
Both the tool's interface and its utilization is quite simple. You can input the mesh to process and inspect the slices of said mesh. A couple of parameters control the amount of sections the final slices square atlas texture will have which squared will determine the total number of slices. Also there is the posibility for setting the resolution of each slice.
The distance field gradient is captured using a shader that samples Unreal's global signed distance field. Upon construction the tool spawns two static mesh actors one for the mesh to be processed and one for the plane that will use said shader to sample the distance field.

The SDF Gradient Material
The shader tha samples the distance field uses both a "Distance Field Gradiend" and a "Distance to Nearest Surface" nodes. The distance field gradient is remapped from the -1 to 1 range into the 0 to 1 range for its correct codification in the final texture. The distance to nearest surface is by default encoded to be extended up to 1 meter (100 units) from the surface of the mesh and is also inverted to stand for a "density" value in raymarcher shaders.

The Tools logic
As mentioned before, upon construction of the widget, the two support meshes are spawned, the viewport camera is moved into capturing position and variables are initialized. Every time the mesh or the input parameters are changed the tool also reinitializes.
When the "Generate Pseudo Volume Texture" button is hit, the capture sequence commences. For each slice a HighResShot is commanded with the desired resolution. After this, a python script finds the newly created screen capture, imports it to the project and add it to an array of slice textures to be used later. Subsequently the plane and the camera move accordingly to prepare for the next capture.
After all the slices have been captured, each of them are fed into a special material that prepares them to be correctly placed in the grid layout and are drawn into the final atlas render target sequentially. When the render target is finished the intermediate texture assets are deleted and the render target can be saved as a static texture.
The tool can be used independently but is thought to be used on a specially prepared level that prevents that lighting conditions or postprocess interfere with the captures.
The python script uses pathlib's rglob to run a recursive search in the projects screenshots folder and then filters the obtained list using the creation time metadata to get the latest image. After this the Unreal python functions are used to import the texture into the temporary destination of the individual slices. The import task also returns the Unreal reference for the newly imported texture which is used to store it in the slices array.
The Atlas compositing material
The Atlas compositing material handles the setting up of each individual slice texture in its correct position on the grid layout. The tool creates a dynamic material based on this material and update the params on each iteration. The material in itself is very simple and just handels the offsetting and scaling of coordinates and the masking out of the out of 0 to 1 bounds pixels.

Final Texture and use in Raymarched shaders
An example if the textures the tool produces can be seen. The slices can be reasonably sparse and the final resolutions can be kept fairly low for many effects. This texture can be applied then for volumetric ray marcher effects as the one shown here. To check this shader you can follow the button below.


// Tools and Scripts / Waterfall Tool
SECTION UNDER CONSTRUCTION
This section is currently just a stub. A detailed technical breakdown will be added at a later date.
C++ tool using Geometry Scripting for automating the generation of rivers, rapids and waterfalls that adapt to the scene.

// Tools and Scripts / Vector Field Baker
UNDER CONSTRUCTION
This section is currently just a stub. A detailed technical breakdown will be added at a later date.
Blueprint / Python Editor utility tool for baking scene information into vector field assets that can be used in particle systems.

// VFX / Ravens Swarm
Short Video Breakdown
Cheap smart interactable GPU Particles System that simulate a swarm of agressive ravens. Done in Unreal Niagara using HLSL shader code modules to drive the behavior.
Full Breakdown
Mesh Modelling and Animation
The mesh for the raven particles was modelled to be as low poly as possible and to have a topology that could be easily animated. The UV space was thought to be maximized by sharing space from islands in symetrical position on the mesh. The Albedo textures were painted through photobashing several real ravens photos directly on the model in blender. Roughness and Normals were derived from the painted albedo texture using GIMP. Roughness was packed as alpha channel in the Albedo texture. Occlusion was packed in the Normals blue channel. The rigging and animations were done by hand directly in blender.
Material and Vertex Animation Set Up
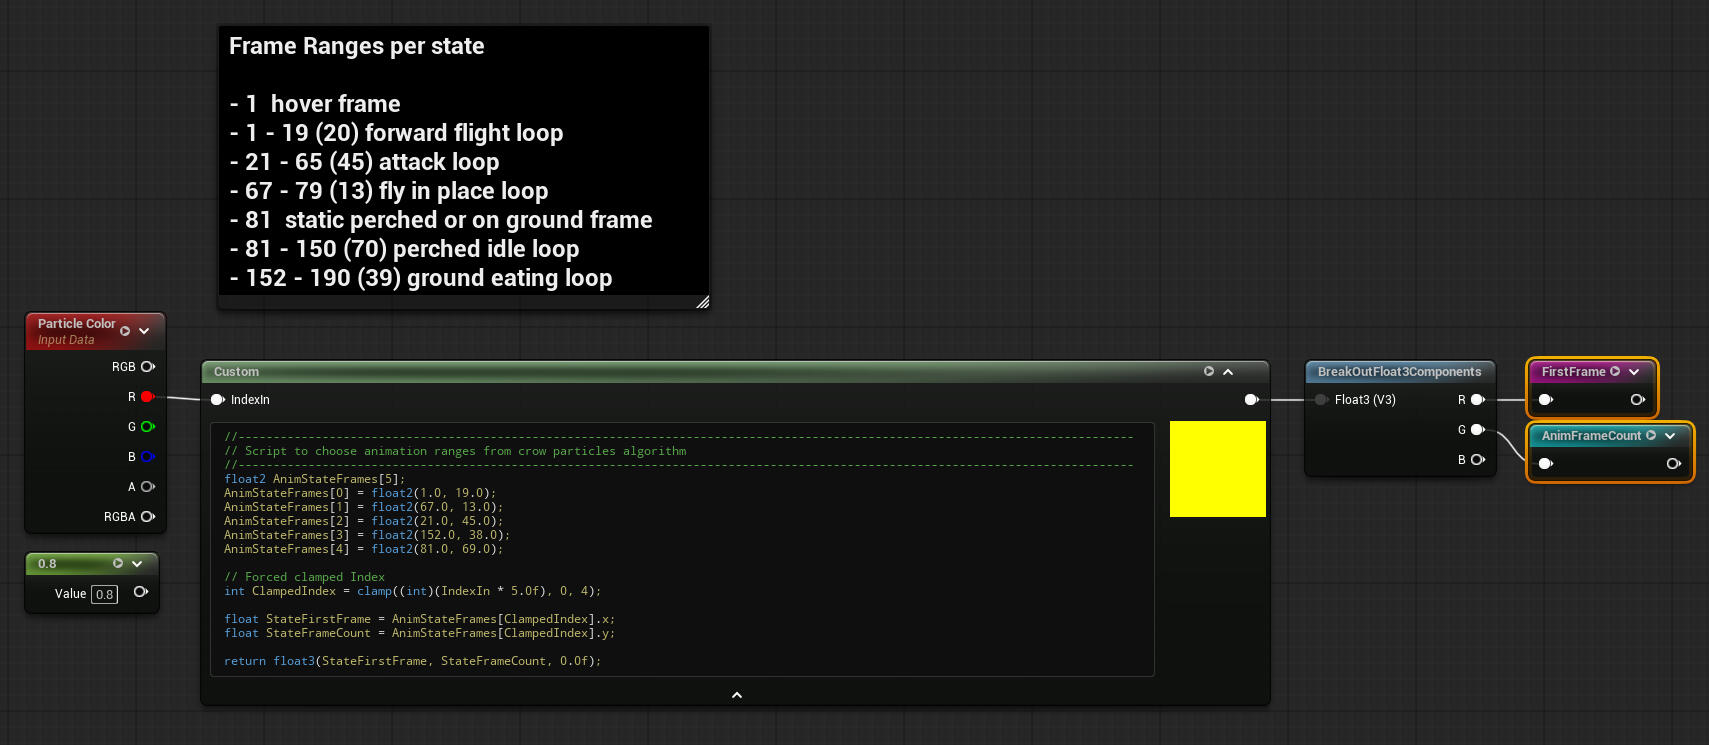
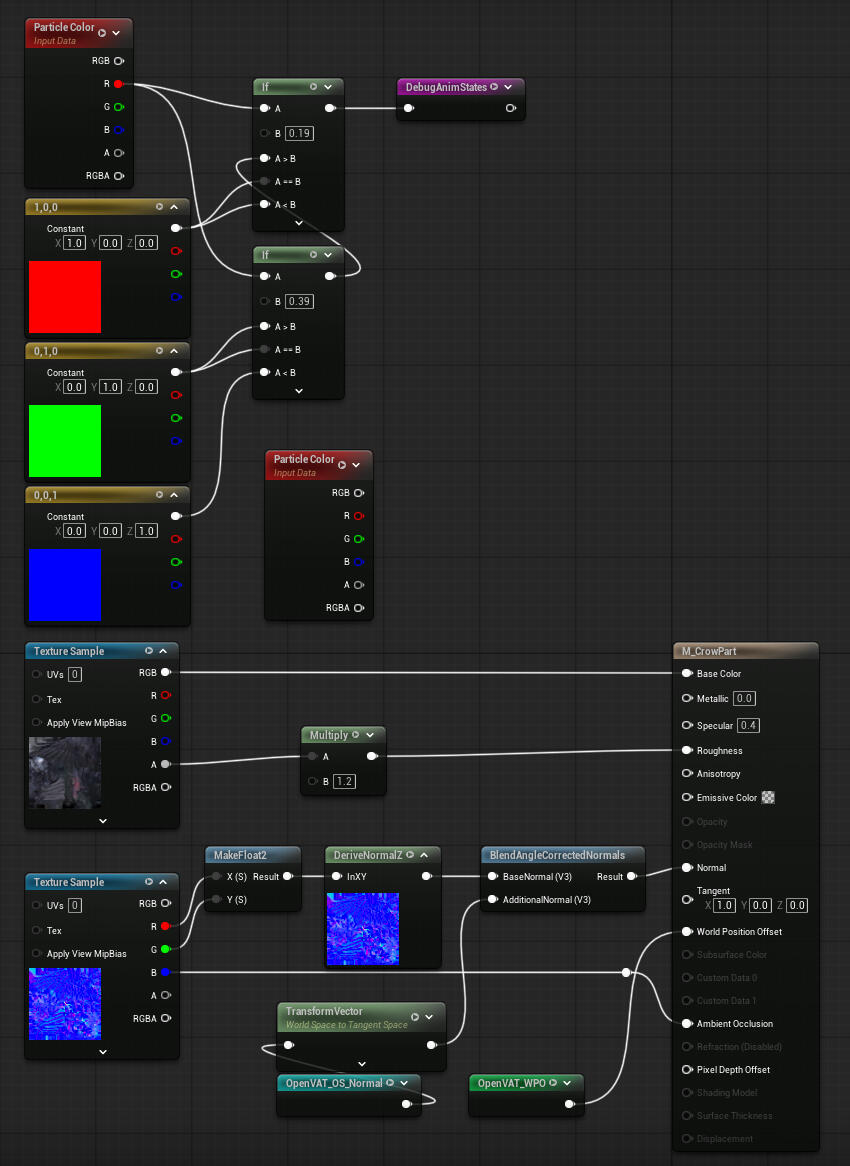
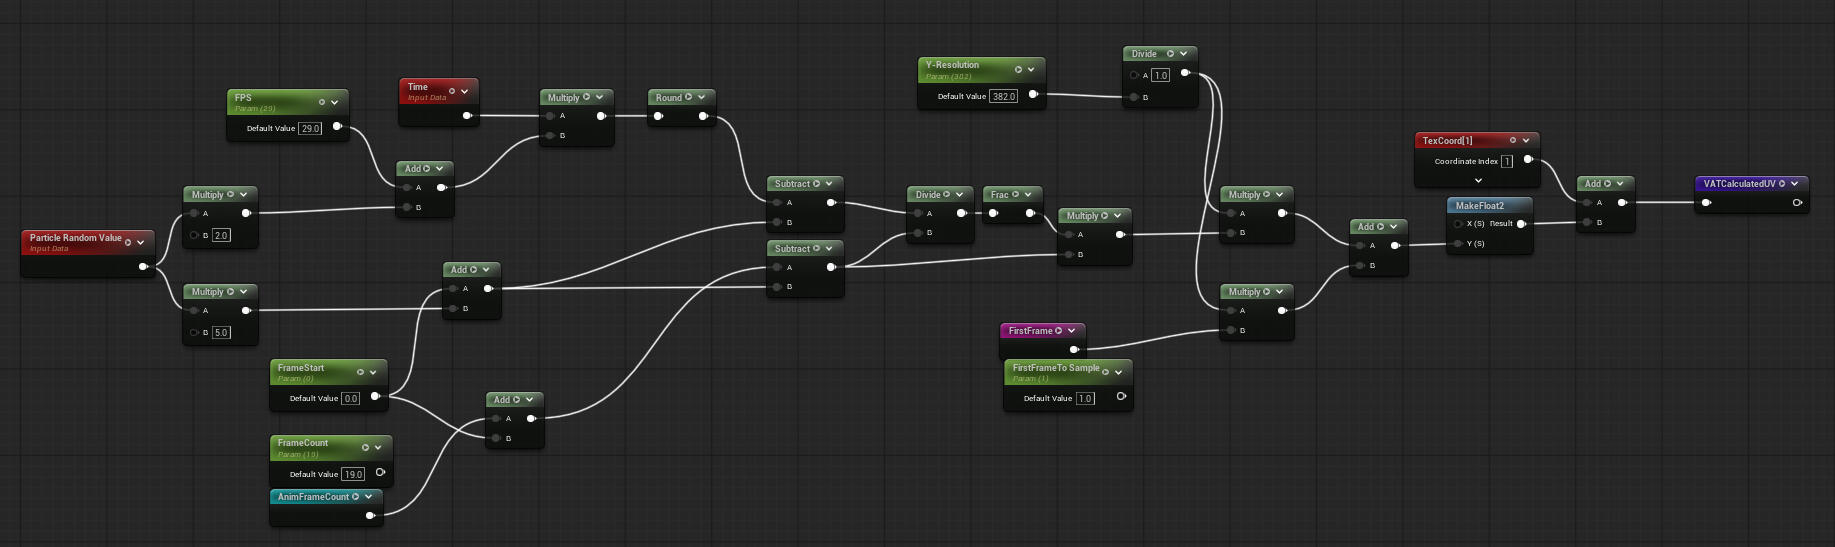
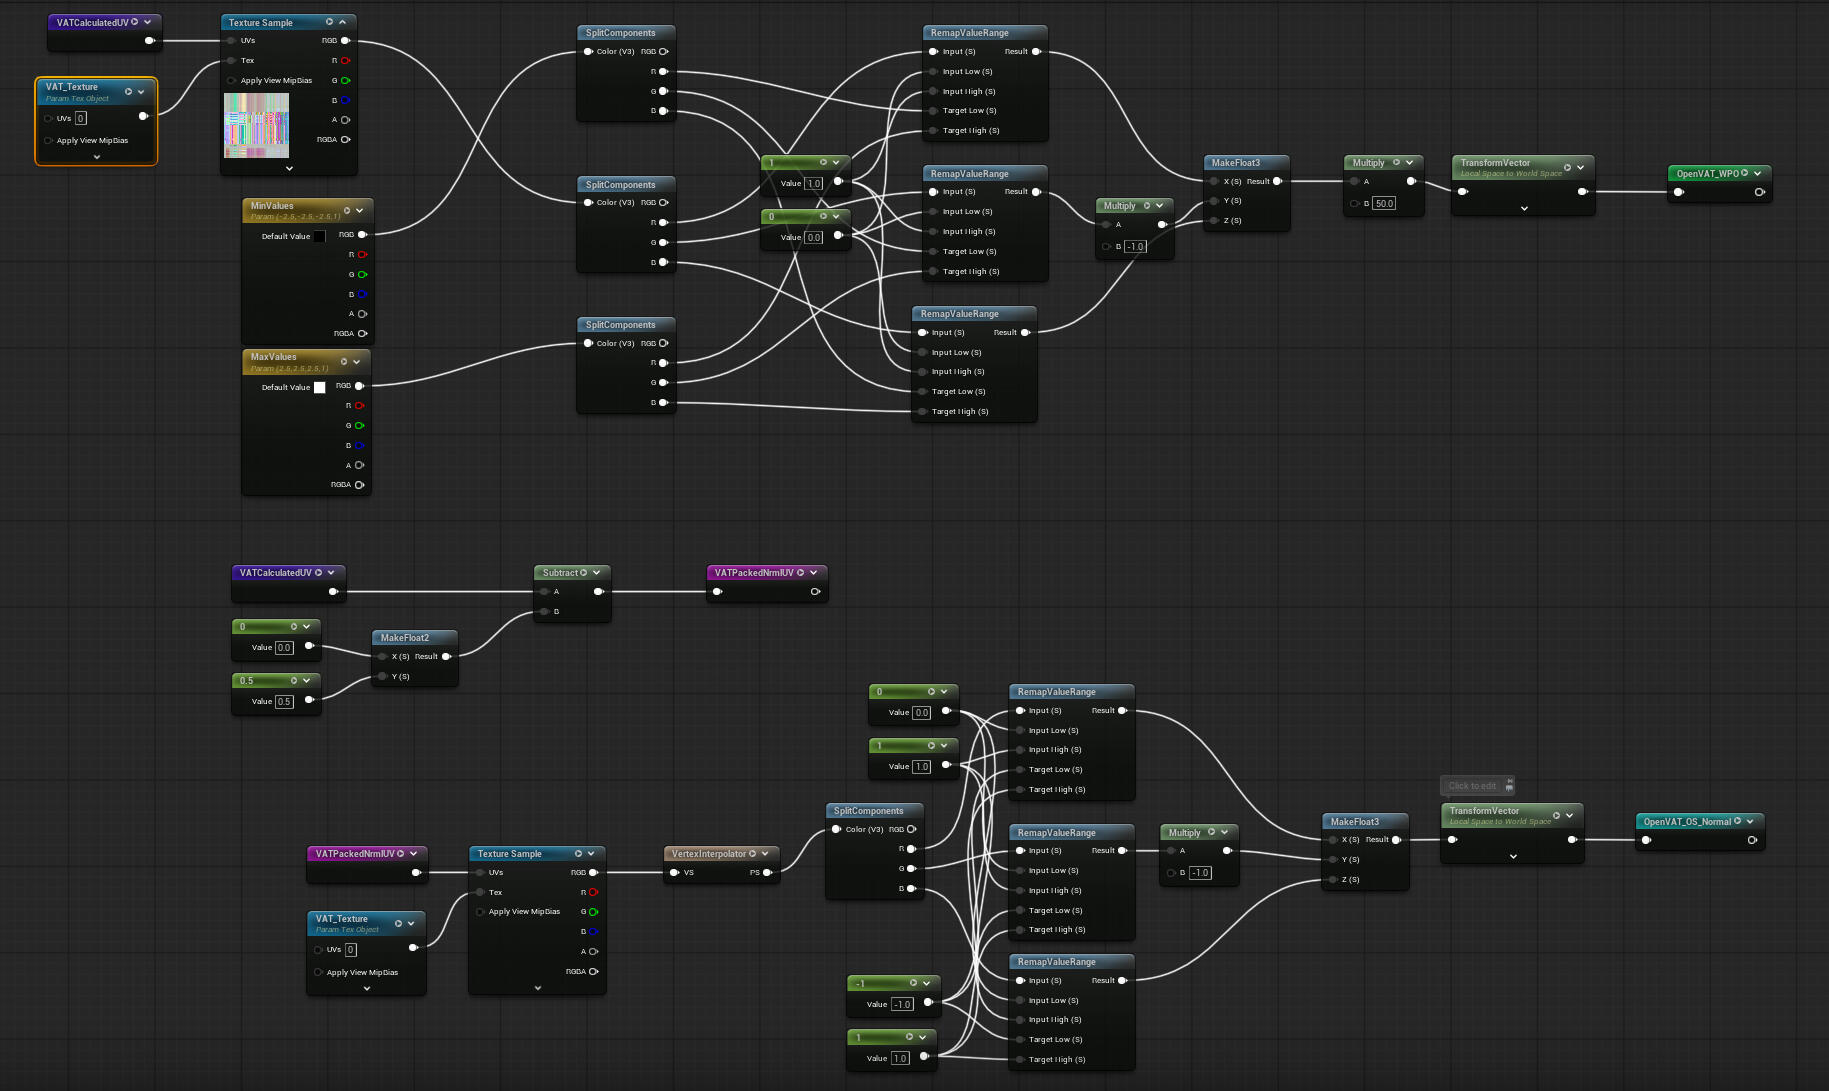
After animation work was done the animated mesh was processed using the OpenVAT add-on and the animations, placed sequentially in a single animation strip, were encoded into the vertex animation texture. After this the processed static version of the mesh was exported to Unreal. There the material was set up to use the VAT logic provided by the creator of the addon. The logic handles the coordinates for sampling of both the positions and recalculated normals per vertex on each animation frame. Additionally I created a simple HLSL script for switching the animation ranges depending on the animation/state the raven would be. Additionally the regular textures for the mesh were set up as usual except for the normals that needed to be corrected with the recalculated normals from the VAT.
Niagara System Set up
After the mesh and its material was set up then I made the Niagara system. The system have two emitters, one for the raven mesh particles proper and one for feathers that the ravens would release depending on the state the ravens would be found themselves in. Both emitters are GPU emitters.
Ravens would spawn far away in a torus shape around the focus point towards which they will go to attack. The scale of the meshes grow from 0 at the beggining of their lifetime and diminishes as the lifetime of the particles runs out and as it flies away.
An audio module plays a looping squaking and fluttering ravens sound depending on the state and amount of raven particles alive in any particular moment.
Most of the logic for the handling of the states, velocity and behavior of the raven particles are handled in acustom Niagara Module Script and a HLSL custom script inside of it. Additionnally a second custom HLSL module handles interparticle collisions through checks on a 3D Neighbors Grid. Also a particle attribute reader is set up to pass on information to the feathers emitter which emit from the raven particle positions depending if they are in their frenzied attack state.

Behavior and avoidance HLSL script
The core of the system is the behavior and avoidance script. It handles the states the raven particles can enter depending of probabilities and their lifetime. The states are:
- 0 - Far Away / Flying towards focus point
- 1 - Circling Around Focus point
- 2 - In a closer-by excited waiting position above the focus point.
- 3 - Directly attacking on the focus point
- 4 - Leaving, flying away
It also handles their behavior depending of the states they are in.
Each particle upon spawning generate a randomized but still ordered lifetime points at which they would enter to each of the sequential states. The randomization is so that first and last states are always the first and the last but that the other states can swap around to give a more chaotic and organic feeling. A raven can come to attack directly from spawning away, can skip the waiting pool or can leave without even attacking depending on their randomized time stamps.
The velocities and rest distances are assigned depending on the state. They are smoothly blended through lerps for continuous and smooth transitions.
This script also handles the player avoidance; that is that ravens will fly away if the player gets near, though they keep interest in their victims corpse and never go too far.
Finally the script handles the scene avoidance so revens do no not go through walls or any other geometry of the scene. For that it is used the Niagara Collision Query Interface accessing the Scene Partial Depth GPU query and comparing with the particles position.
3D Neighbor Grid Interparticle Collisions
Upon emitter update the 3D Neighbor Grid interface is initialized in a custom scratch pad module. On a new custom emitter stage the grid is populated by the living particles and on subsequent custom stage stage are handled the interparticle collision checks using another HLSL script.
The script first initialize an array of 27 3D offsets representing a grid cell and their 26 immediate neighbouring cells. Then the grid params are obtained and stored.
After this, two nested loops run per grid cell and per particle in each neighboring cell to check the distance to the current particle. The cummulative resulting vectors from intersection with neighboring particles is calculated and from it an offset in position and an added velocity are assigned to the corresponding particle.
// VFX / Stylized Monsters Attack Particles
SECTION PARTIALLY UNDER CONSTRUCTION
This section is currently just a stub. A detailed technical breakdown will be added at a later date.
Stylized particle effects for low poly enemy monsters in a friend's project.

Quick Video Breakdown
// Materials and Shaders / Impact Frame
UNDER CONSTRUCTION
This section is currently just a stub. A detailed technical breakdown will be added at a later date.
Unreal Post-Process Material to create a high contrast anime-like impact frame effect and its use in gameplay prototype.

// Materials and Shaders / Heavy Rain Post-Process
UNDER CONSTRUCTION
This section is currently just a stub. A detailed technical breakdown will be added at a later date.
Complex Unreal Post-Process Material set to quickly and cheaply add adjustable heavy pouring rain to any scene.

// Materials and Shaders / Pseudo Volume texture Raymarched shaders
Raymarched Misty Specimen Jar Shader
This shader is a HLSL raymarcher that profits from using Pseudo-Volume Textures as input to create volumetric effects. This shader in particular is an stylized material to create specimen-jar-like effect of an object within some misty liquids in a container without actually having to have actual geometry inside. What you see in the picture are just empty cilinders. Moreover the material is opaque so no translucency is involved whatsoever. The shader incorporate some normals trickery to fake some degree of translucency.
The core of the shader is the HLSL raymarcher. The pseudo-volume texture is sampled using the PseudoVolumeTexture() method.


As with any raymarcher algorithm the inputs include the Ray Origin, the Ray Direction and the max length of the ray, called here Box Size since I use the bounding box radius. For the Ray Origin local coords is used the UVW Normalized Bounding Box. Additional distortions are introduced here to add some liquid movement and refraction-like effect. The logic of the script starts with the variable initializations proceeds with the loop to iterate over the ray steps. A masking factor is introduced to remove anything outside the 0 to 1 bounds range. The accumulative "Opacity" (in many raymarchers called Density) is determined here mainly from the length of the sampled vector value and after applying a cut value that determine how much to "inflate" the resulting shape. Cut values near 1 give a shape close to that of the original mesh, which in this case was desired.
The Accumulative "Normals" are obtained directly from the proper sampled vector value but applyin a higher weight to steps closer to the camera. At the output from the HLSL custom node the Normals are remapped back to the -1 to 1 range and transformed to world space.
The output opacity values are used mostly for blending several attributes of the raymarched shape against the rest of the pixels of the mesh. An emissive effect of a light coming from above was also added using the raymarched normals and a fresnel node.


Final result and testing fake translucency
The shader also include a trickery in the normals that allows for faking translucency under certain conditions. That is when roughness is in the range between just below 0.2 but just above 0 and you input an inverted camera vector as the normals, the engine defaults to using the lumen representation for the reflections but since the camera vector is inverted you get a see-through effect that allows to visualize the lumen scene representation behind the mesh.
The current version of the shader was tested in this lab enviroment. The effect seems to work very well in stylized but detailed enviroments like this.
Performance
Performance-wise this shader is quite good. Though it is not a simple shader, its complexity is fairly low compared to other techniques that could be used to achive a similar result. Additionally, since it is opaque there is no overdraw. The raymarching proper can be easily scaled down if necessary by reducing the number of steps used. Additionnally the pseudo volume textures used in this kind of shaders can be of a fairly low resolution.


// Materials and Shaders / CRT shader for emulators
Breakdown
This a simple postprocess shader that simulates CRT TV like effects to be applied mainly in the Nintendo GameCube / Wii emulator Dolphin. The shader applies as cheaply as possible a set of layered effects to the rendered image:
♦ Lens like distortion: to simulate curvature on CRT TVs
♦ Bloom: To simulate the color bleeding that CRT get specially on bright areas of the image
♦ Increased Saturation and Contrast: To try to emulate the perceptual color ranges in CRT TVs
♦ Vignette: Adds to the CRT effect
♦ Pixels and Scanlines: Main CRT featuresCheck it out on Github
Comparison
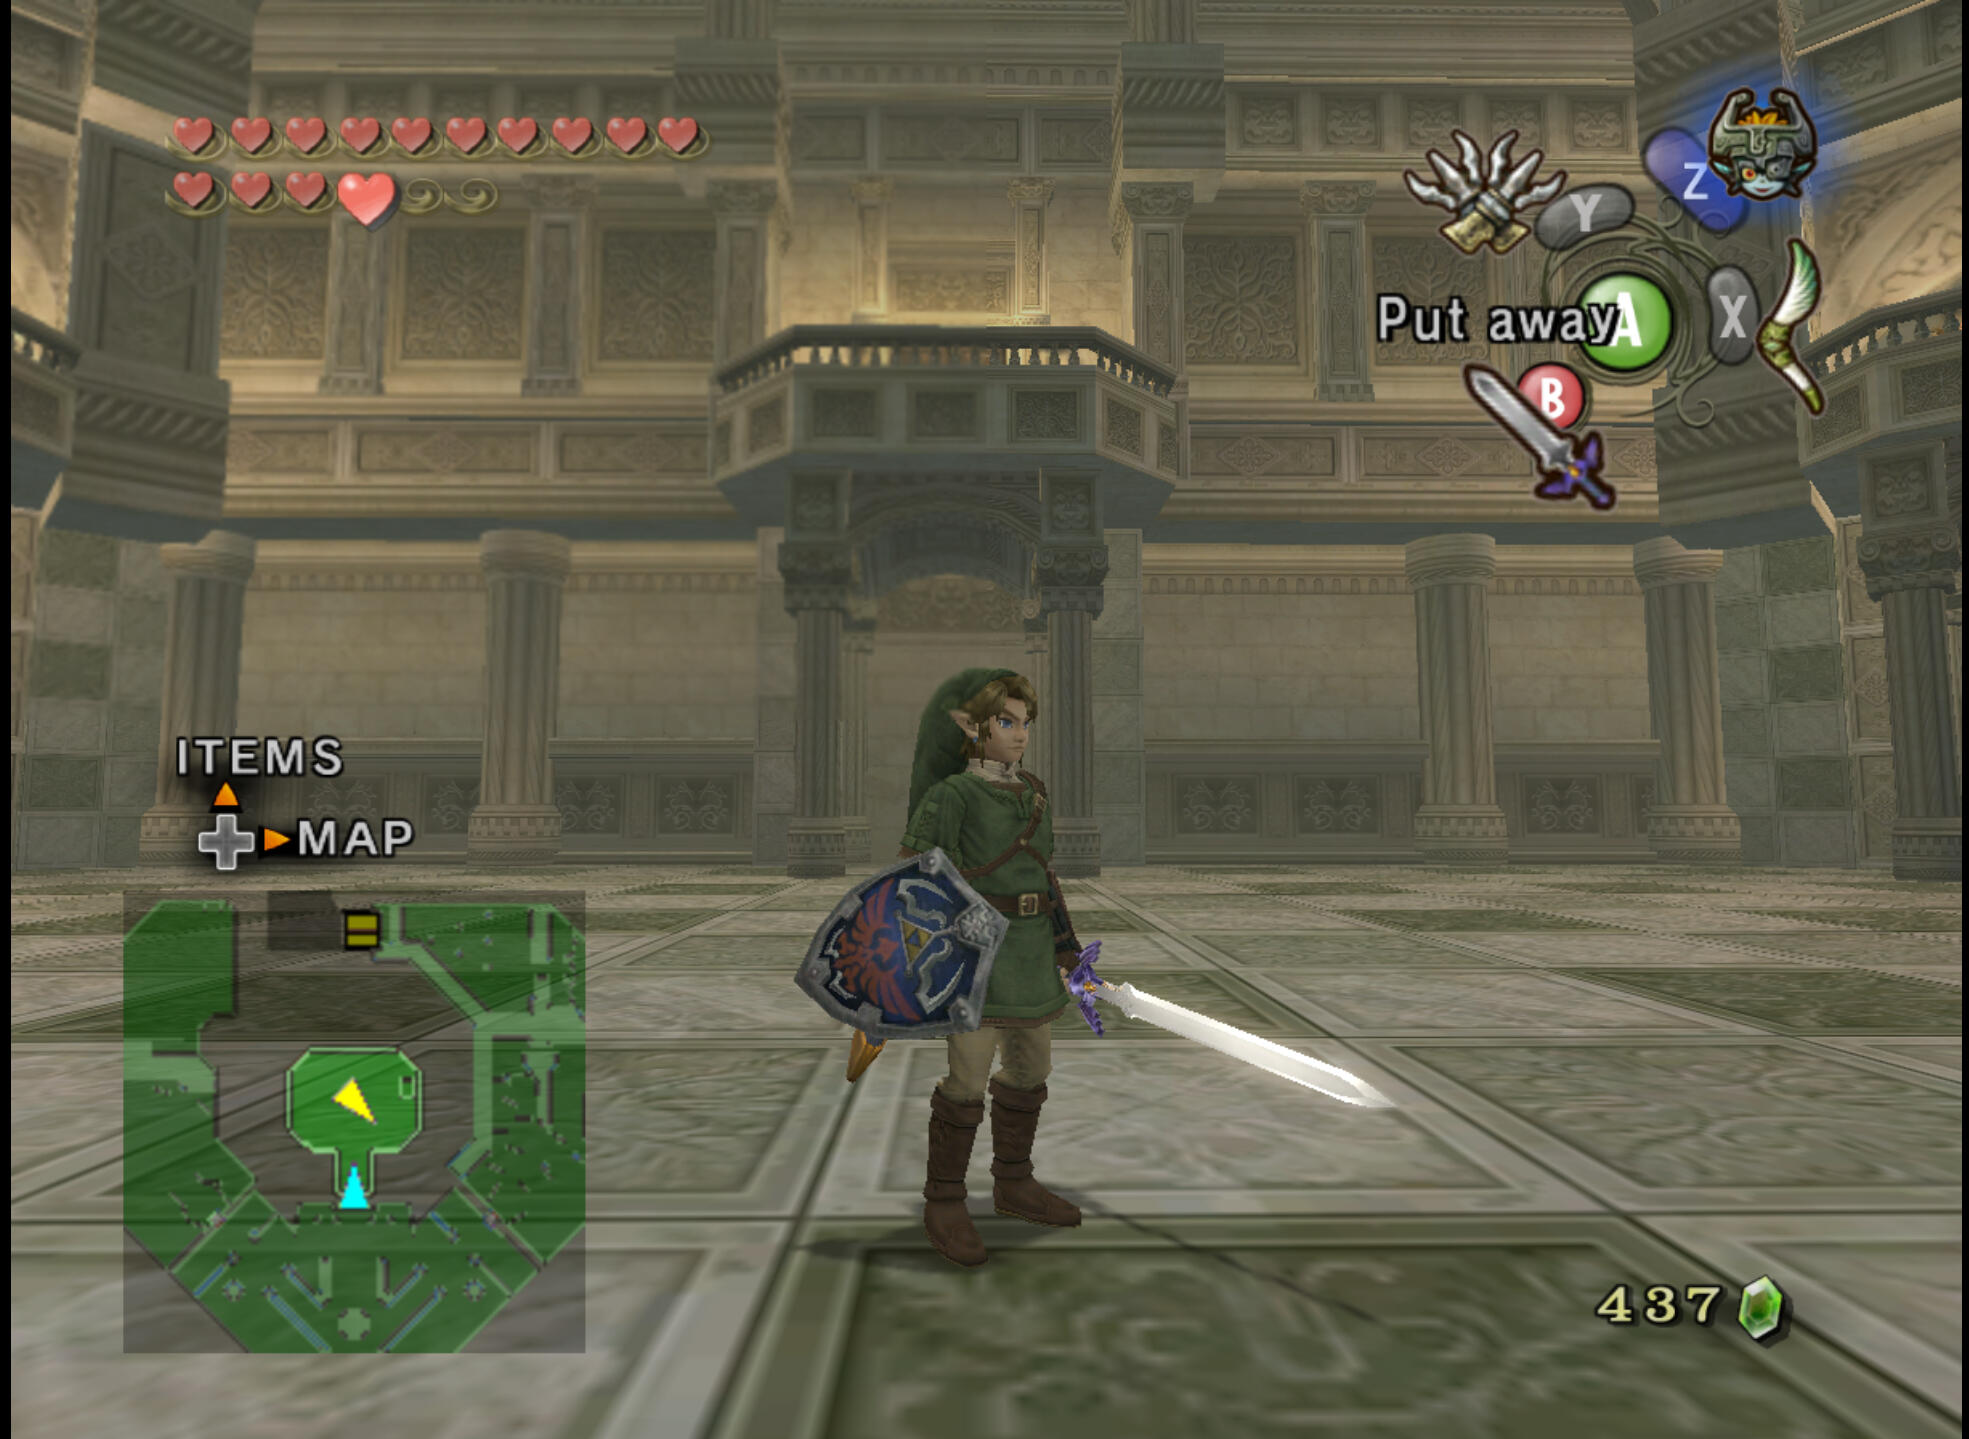
Regular rendering before applying the post-process shader
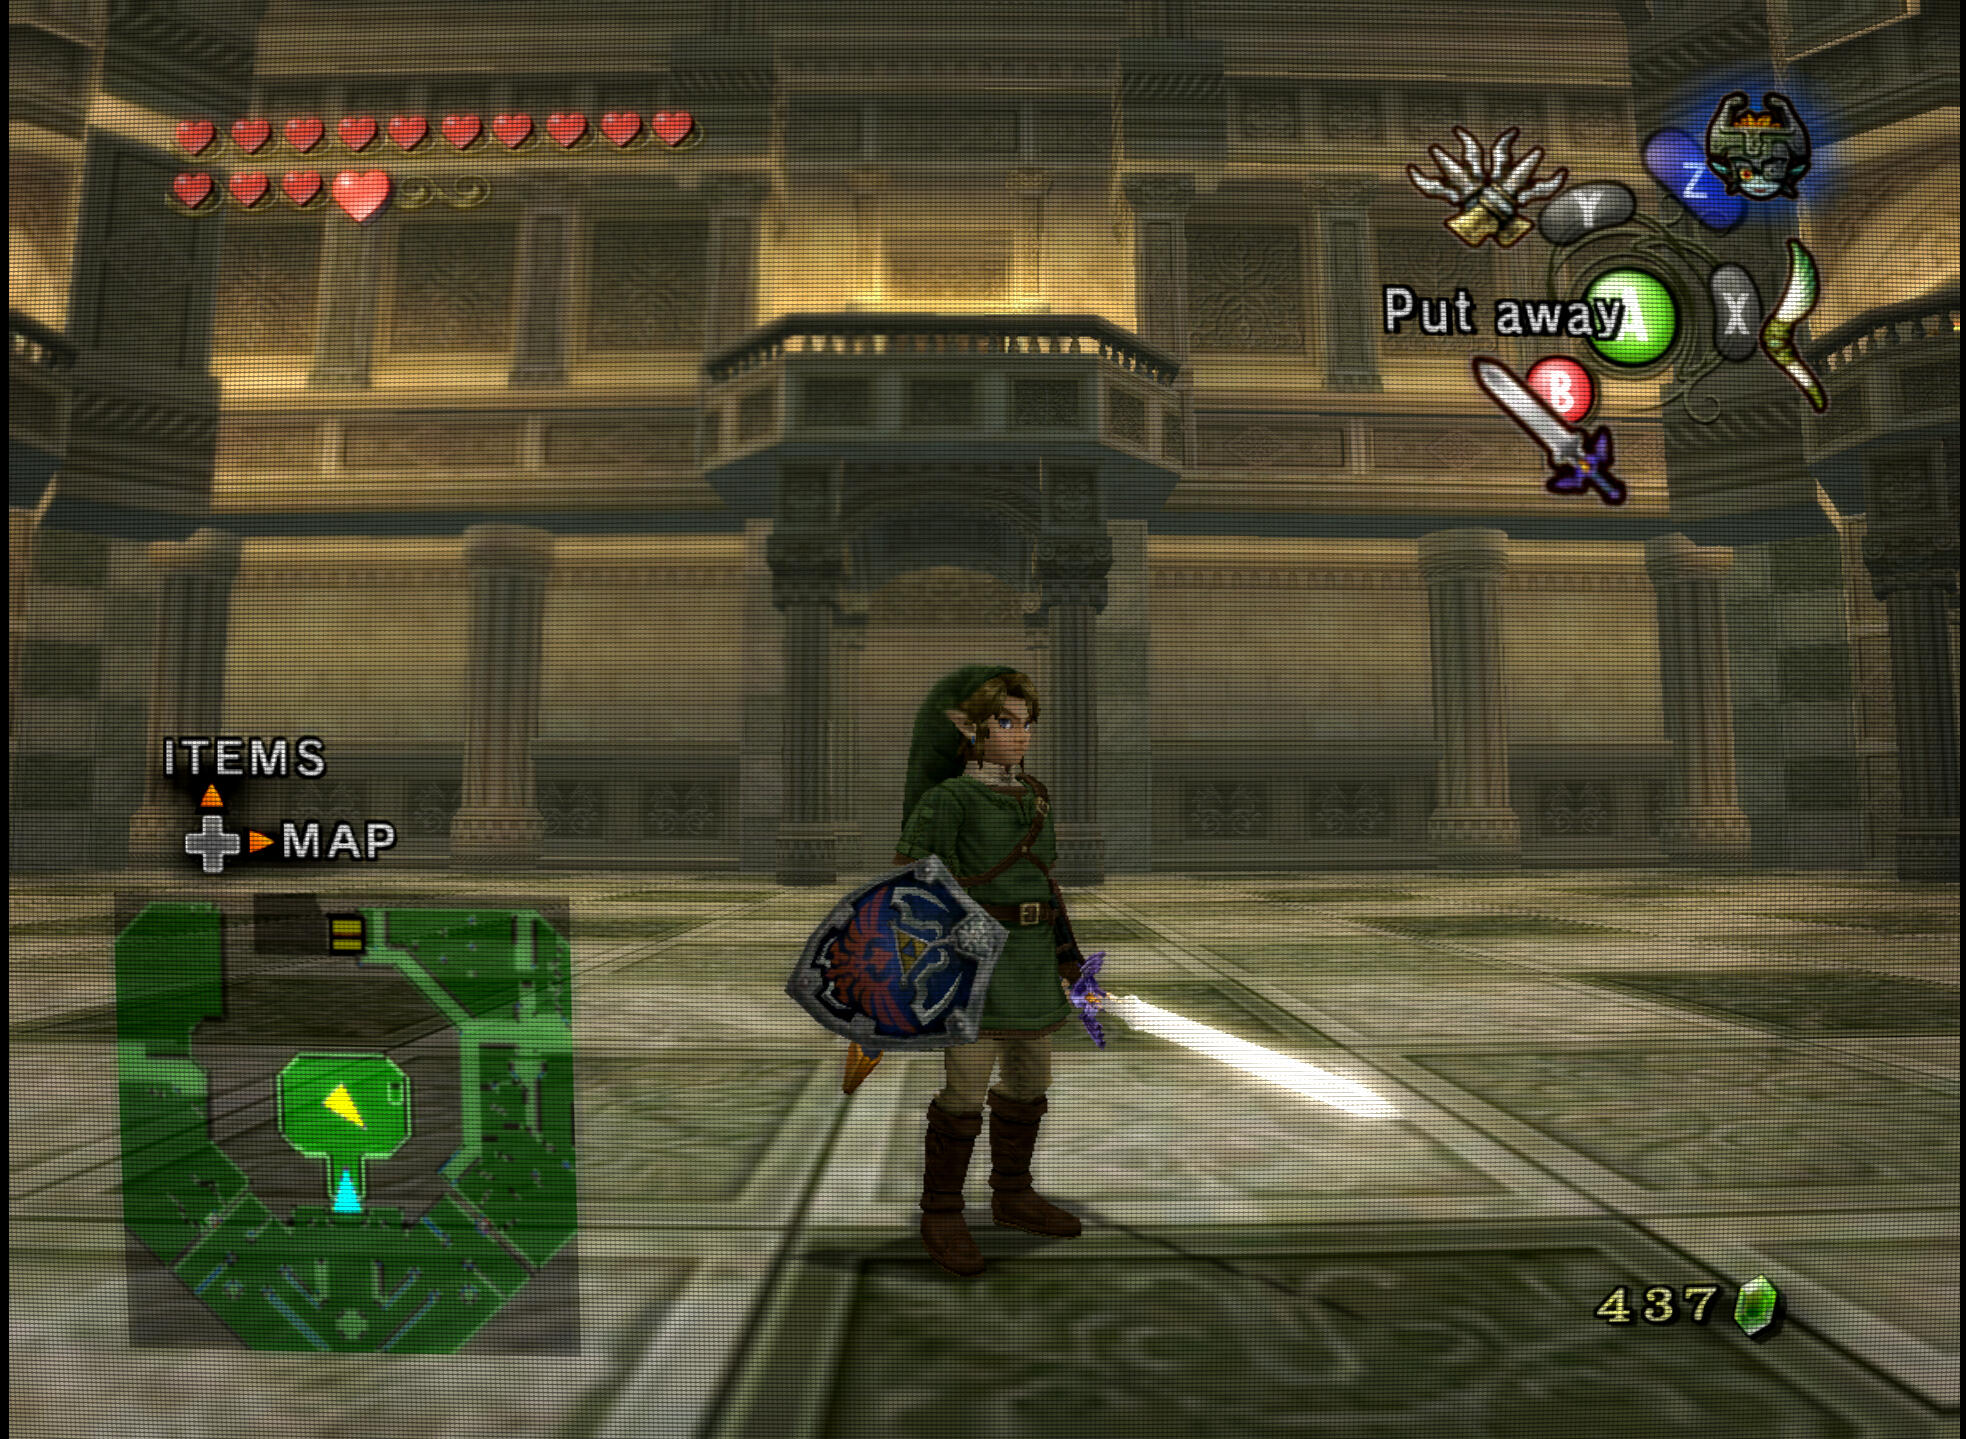
After applying the post-process shader
// Lighting, Level art and design / Fractal cave level
SECTION UNDER CONSTRUCTION
This section is currently just a stub. A detailed technical breakdown will be added at a later date.
Unreal Engine fantasy scene almost completely made out of 3D fractal mesh models generated with the software Mandelbulber 2 and using in-engine procedural tools for its placement.

// Lighting, Level art and design / Unlit Level Art in A-VOID
For the puzzle game A-VOID the art pipeline was designed to be compatible with having the best rendering performance possible so it could run on mobile devices. Since the scale and scope of the level scenes was small it was decided to go fully with the use of purely unlit materials. Several techniques where used to create the textures, mainly prebaked lighting via a twin blender scene, digitally processed images and hand-painted textures. The game has 9 color themed scenes (yes, names were an homage to several sci-fi literature authors, can you get all the refs? ;) ):
► a Hub for accessing all the worlds
► Montag Planet: a canyon in a volcanic planet
► Nautilus Moon: a oceanic rainy moon
► Rama Asteroid: a frozen asteroid
► Atreides Nebula: a yellow gasy nebula
► Dyson Reactor: an alien huge energy structure
► Morlock Blackhole: the orbit of a black hole
► Arroway Hyperspace Run: hyperspace wormhole
► Trantor Dimensions: huge abstract structures
The Hub


The Hub level is a single room that hold the doors to all the actual playable puzzle levles. The room is composed of 4 meshes, namely a walls mesh, a transparent floor mesh, a reflections mesh below it and a doors mesh. The doors get activated as certain number of puzzles get solved in each level. This is done sequentially so lighting in the room changes as the glowing doors get activated. For this several lightmap textures had to be baked and the materials had to be synced with the game advancement to reflect correctly the unlocked levels.
Montag Planet


Montag planet level was made just as simple canyon of black volcanic rock with a lava river flowing below. The scene has a very simple construction that comprises the canyon mesh itself, a lava river mesh, a sky sphere and a couple of smoke particle systems. The main canyon texture was baked also from its twin scene in blender. The Canyon mesh could be made fairly high poly count thanks to the simplcitiy of the scene and the large breathing room the usage of extremely cheap rendering gave us performance-wise. This allowed for making it more interesting visually.
The lava river mesh was made to have a straight UV layout despite its curved topology in 3D space. This allowed for a cheap way of having an interesting flowing pattern.

Nautilus Moon
SECTION UNDER CONSTRUCTION
Rama Asteroid
SECTION UNDER CONSTRUCTION
Atreides Nebula
SECTION UNDER CONSTRUCTION
Dyson Reactor
SECTION UNDER CONSTRUCTION
Morlock Blackhole
SECTION UNDER CONSTRUCTION
Arroway Hyperspace Run
SECTION UNDER CONSTRUCTION
Trantor Dimension
SECTION UNDER CONSTRUCTION
// Characters and Technical Animation / Non Bipedal Creature Procedural Animation
SECTION UNDER CONSTRUCTION
This section is currently just a stub. A detailed technical breakdown will be added at a later date.
Control Rig / Animation Blueprint procedural animation of centipede AI enemy creatures made for the Above Land Project

// Characters and Technical Animation / Stylized Monsters Animations
SECTION UNDER CONSTRUCTION
This section is currently just a stub. A detailed technical breakdown will be added at a later date.
Rigging and stylized animations in low poly enemy monsters in a friend's project.

Quick Video Breakdown
// Characters and Technical Animation / Stylized Zombies
A set of cartoonish zombies and skelletons I modelled in blender for a Jam game with some good friends. You can check the game on itch.io by clicking the following link:
Model descriptions
Regular Zombie
Skelleton
Big Zombie
Test
Mauris porta ex id nisl eleifend blandit a eu ex. Praesent nunc massa, lorem sed finibus ac, vehicula eget diam. Sed faucibus feugiat neque eget amet interdum. Nunc at tortor eget purus faucibus tempor. Donec sagittis suscipit porta. Duis mollis orci non erat convallis fringilla. Mauris porta ex sed nisl eleifend magna nisl et magna feugiat neque eget interdum. Nunc at tortor eget purus faucibus tempor. Donec sagittis suscipit porta. Duis mollis orci non erat convallis fringilla sed interdum.Duis mollis orci non erat convallis fringilla. Mauris porta ex id nisl eleifend blandit a eu ex. Praesent nunc massa, pellentesque sed finibus ac, vehicula eget diam. Sed faucibus feugiat neque eget interdum. Nunc at tortor eget purus faucibus sagittis suscipit porta.
// Professional Projects / Lysward
Lysward is a single-player survival adventure set in a vast and unforgiving desert in the fantastical world of Umbra. Explore, craft, team up with your companion, and leverage the Amri magic to endure the heat.
Role: Senior Technical Artist
Work Form: External Partner / Outsource
Scope: Specialized Services
Main Areas: Technical Lighting, Actors and Gameplay Logic, Enviroment Art, Tools and Scripting, Profiling and Optimization
The owning company retains all the rights to any technical description or breakdown of the work done. All that is presented here are just final results and minimal descriptions of some of the work done.
Hidden Emissive Geo Lumen Soft light Actors
Level Light Audit Tool
Capture Points Tool
Lighting pass and Gameplay event logic
Prototyping of special shader effects
Investigation and identification of general performance Bottlenecks
// Professional Projects / Exoborne

Open-world, tactical extraction shooter set in a world torn apart by extreme forces of nature. Customize powerful exo-rigs to gain strategic advantage in ever-changing weather conditions. Face hostile factions, enemy players, and Mother Nature herself in intense high-stakes sessions.
Role: Technical Artist
Work Form: In-House, Full-Time
Scope: Full cycle development
Main Areas: Procedural Content, Enviroment Art, Gameplay Actors, Tools and Scripting, Materials and VFX, Profiling and Optimization.
The owning company retains all the rights to any technical description or breakdown of the work done. All that is presented here are just final results and minimal descriptions of some of the work done.
Waterfall tool
Extraction beacon screens
Extraction propellers
Destructibles
Soft destructibles vertex anim functions
Props wind vertex animations
Auto gym maker for art assets review
World rain dripping prototype
Indoor volumes debugging visualizer
PCG data baker and exporter
Rivers cheap water shaders
Wetness global mat functions
Floating actors finder tool
Materials usage audit tool
// Professional Projects / AboveLand

AAA MMOARPG (Massively Multiplayer Online Adventure Role Play Game) set in a magical world above the clouds, humans and mythological creatures attempt to find a way to co-exist. A place where technology and fantasy blend together, new world meets the old and epic adventures await around every corner.
Role: Technical Artist
Work Form: In-House, Full-Time
Scope: Full cycle development
Main Areas: Procedural Content, Procedural Animations, Gameplay Actors, Tools and Scripting, Special Materials and VFX, Profiling and Optimization.
The owning company retains all the rights to any technical description or breakdown of the work done. All that is presented here are just final results and minimal descriptions of some of the work done.
// Professional Projects / FusyFox

FusyFox is a fast-paced multiplayer third-person arena shooter that allows players to play and participate in tournaments. It combines Free-to-play and blockchain-based Play-to-earn models.
Role: Senior Technical Artist
Work Form: In-House, Full-Time
Scope: Full cycle development
Main Areas: Procedural Content, Gameplay Actors, Level Design, Tools and Scripting, Materials and VFX, Modular Characters, Vehicles Gameplay, Profiling and Optimization.
The owning company retains all the rights to any technical description or breakdown of the work done. All that is presented here are just final results and minimal descriptions of some of the work done.
// Professional Projects / Goldfever

Gold Fever is a challenging, free-to-play, blockchain-based, survival PVP MMO. Its map is covered by dense and dangerous rainforests, tall mountains and, rivers filled with gold. Players can craft tools for survival and combat, forage for plants and herbs, and compete with other players.
Role: Senior Technical Artist
Work Form: In-House, Full-Time
Scope: Full cycle development
Main Areas: Procedural Content, Procedural Animations, Gameplay Actors, Tools and Scripting, Materials and VFX, Modular Characters, Vehicles Gameplay, Profiling and Optimization.
The owning company retains all the rights to any technical description or breakdown of the work done. All that is presented here are just final results and minimal descriptions of some of the work done.
// Professional Projects / A-VOID

A-VOID is a free-to-play mobile puzzle game for android devices. Akira must save her home planet from being devoured by its sun turned into a monstrous red supergiant star. To save her kin she must pass the trials of the guardians and gather enough core-cubes to gain control of the temple of the ancestors.
Role: Art Lead
Work Form: In-House, Full-Time and Consulting
Scope: Full cycle development
Main Areas: 3D Art, Level and Game Design, Gameplay Actors, Tools and Scripting, Materials and VFX, Profiling and Optimization.
The owning company retains all the rights to any technical description or breakdown of the work done. All that is presented here are just final results and minimal descriptions of some of the work done.